Marble Nails for Beginners: 3 Easy Methods That Work
Learn marble nails for beginners with simple steps, three easy methods, common mistakes to avoid, and aftercare tips for a polished stone-look manicure.

The first time I tried marble nails, I was sure I had ruined my manicure before I even started. My swirls looked like a spilled bowl of soup, and my cuticles were the color of a bruised plum. I almost gave up on the whole idea. Then I realized the effect is far more forgiving than it looks, and that most of the drama comes down to a few small habits.
Jump to section
Marble nails have that soft, veined, stone-like look that seems impossible to draw by hand. The good news is that you are not really drawing anything. You are letting thin lines of color drift and blur into each other, and the imperfect result is exactly what makes it look like real marble. Wobbly is the goal here, which is a rare gift in nail art.
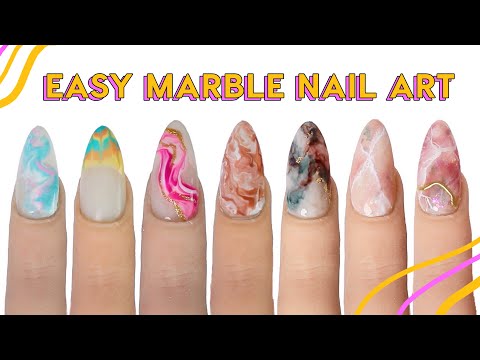
In this guide I will walk through what you need, a simple step-by-step routine, three easy variations, and the mistakes I made so you do not have to. Tina Yong’s walkthrough below shows several methods side by side, so watch it first if you like seeing techniques in motion.
What you need for marble nails
You do not need a fancy kit. Most of this is probably already in your drawer, and anything missing is cheap.
- A light base color: white, cream, soft pink, or a pale nude. Light bases make veins show up best.
- One or two accent shades: gray, black, gold, or a soft contrasting color for the veining.
- Top coat: a glossy one is classic, and it is what gives marble that polished-stone look.
- A thin brush or dotting tool: a toothpick works in a pinch.
- Small piece of plastic wrap or a clean sponge: only for the dry method below.
- Liquid latex, tape, or a rich hand cream: to protect skin around the nail, especially for the water method.
- Nail polish remover and a cotton swab: for clean-up at the end.
- A small cup of room-temperature water: only for the water method.
Basic marble nails, step by step
This is the beginner-friendly version I come back to most often. It uses a brush and regular polish, so there is nothing to buy.
- Prep your nails: shape them, push back your cuticles gently, and wipe each nail with remover so the polish grips.
- Apply a base coat and let it dry for a minute or so.
- Paint two thin coats of your light base color and let them dry completely. Tacky polish will smear your veins into mud.
- Put a tiny dot of gray or black polish on a scrap of foil or a plastic lid. Using a thin brush, draw two or three wavering diagonal lines across the nail. Keep them uneven, and do not go edge to edge every time.
- Dab a clean, slightly damp brush or cotton swab along the lines so the edges soften and blur. Blend gently, since pressing hard drags color everywhere.
- Add one or two hair-thin secondary lines that branch off the main vein. This is what sells the stone look.
- Let it set for a minute, then seal with a glossy top coat. Cap the free edge to help it last.
- Clean up around the cuticles with a swab dipped in remover.
Three marble methods to try
1. The water marble
This is the one that looks most dramatic. You drop a few polish colors onto the surface of room-temperature water, swirl them lightly with a toothpick, and dip your finger through the pattern. The polish clings to your nail. It is fun, but it is also the messiest, so use latex or tape around your fingertip first and expect to practice a few times. Work one finger at a time, because the film on the water dries quickly.
2. The plastic-wrap method
If water sounds like too much, this is my favorite low-stress option. Paint your base color, then while the accent polish is still wet, press a scrunched piece of plastic wrap onto it and lift. The wrinkles leave random, veiny patterns. Clean up any blobs with a brush, seal, and you are done. It is fast enough to do all ten nails without rushing.
3. Gel or builder blooming
If you use gel polish and a lamp, a clear blooming gel spreads color outward into soft cloud-like veins. Apply the clear gel over your base, dot a little color into it, and let it spread before curing. The timing depends on your product, so follow the directions that came with your kit. It can look stunning, especially over a glazed finish like the ones in our glazed donut nails guide.
Common mistakes and how to fix them
- Muddy, gray blobs: you are usually working over polish that is not dry, or blending too much. Wait longer between layers and use a lighter touch.
- Veins that look too neat: real marble is irregular. Vary the thickness and let some lines fade out mid-nail.
- Too many colors: two or three shades is plenty. Beginners often crowd the nail, and the pattern turns chaotic instead of elegant.
- Thick polish: if your bottle has gone gloopy, thin it with a drop of proper polish thinner, not remover.
- Skipping the top coat: without it, the finish looks flat and the veins can scuff. A glossy top coat makes marble look like stone.
- Messy skin: if the water method left you with colored fingers, soak a cotton swab in remover and work slowly around the edges.
If you are still building confidence with precise lines, start on a plain white manicure. Our simple white nail designs are a great warm-up, and a white base is the most forgiving canvas for veining.
Aftercare and making it last
Marble nails do not need special treatment, but a few habits help them stay fresh. Reapply a thin layer of top coat every two or three days to keep the shine up and protect the design. Wear gloves for dishes and cleaning, since long soaks and harsh cleaners dull polish and can lift the edges. Keep your cuticles moisturized with oil or cream so the manicure looks polished at the base too.
Avoid using your nails as tools, because chips usually start at the tip. When you are ready to remove the design, use remover and take your time rather than peeling. If you are looking for what to try next, browse our nail art ideas for more designs at a similar skill level.
Frequently asked questions
Do I need a nail art kit to do marble nails?
No. Regular polish, a thin brush or toothpick, and a top coat are enough for the basic method. A kit is only worth it if you want to try gel blooming.
Which colors work best for beginners?
A white or pale base with gray or black veins is the easiest and gives the classic stone look. Soft pink with gold veining is also very forgiving.
How long does a marble manicure take?
Plan on about an hour for your first attempt, including drying time. With practice, the plastic-wrap method can take much less, while the water method takes longer because of the clean-up.