Tortoiseshell Nails Tutorial: Easy Amber Nail Art
A relaxed, beginner-friendly tortoiseshell nail tutorial with an amber base, irregular brown spots and a glossy finish.

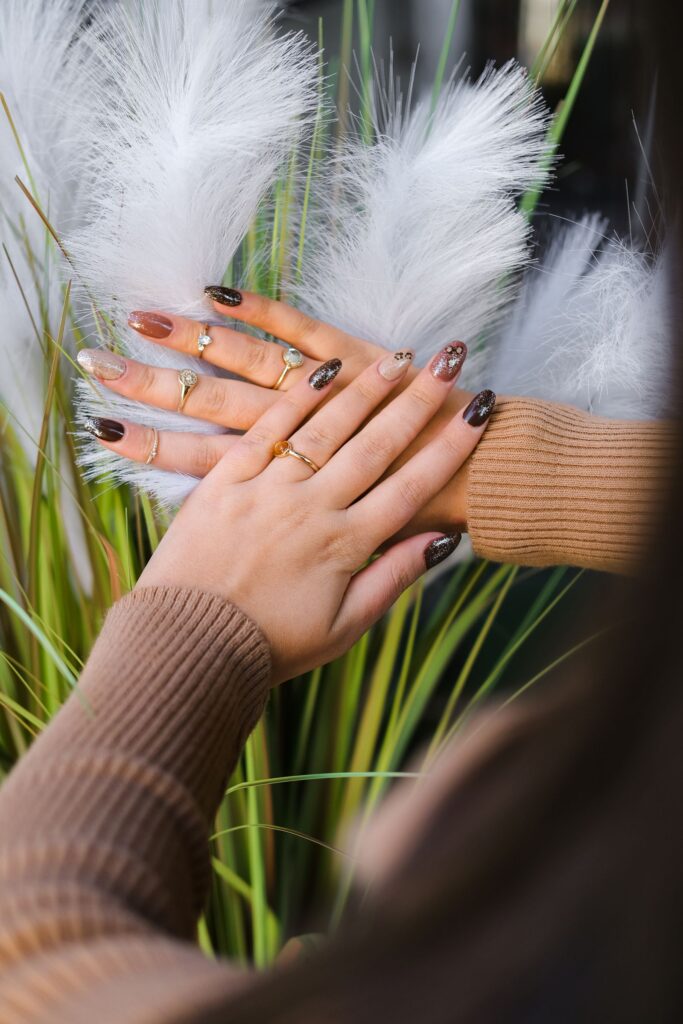
Tortoiseshell nails have that warm, amber-and-brown, slightly glassy look of vintage eyeglasses. They are one of those designs that look complicated but are surprisingly relaxed to paint. The pattern is meant to be irregular, so there is no way to get it wrong.
Jump to section
I love them for autumn, but honestly they work all year. A neutral, honey-toned base with a few dark blotches goes with almost everything in your closet, and it grows out gracefully too.
NailsByKatieDutra has an easy tortoise shell nail art tutorial, and their tutorial is below. I have added my own supply list, steps and troubleshooting notes after the video to help you get the look at home.

What a tortoiseshell design looks like
The look starts with a translucent amber or honey base. Over it, you dab irregular spots of dark brown, sometimes with a touch of deeper caramel or a soft cloudy edge. A glossy top coat gives the depth that makes it feel like real shell.
The key is that the blotches are uneven, with soft edges and a few overlapping. If every spot is the same size, it reads as a leopard print, so vary them.
Supplies
- Base coat and glossy top coat
- A sheer amber, honey or yellow-brown polish or gel
- A dark brown polish or gel
- A lighter caramel or orange-brown for in-between spots (optional)
- A thin detail brush or dotting tool
- A small sponge (optional) for soft edges
- A palette or foil
- Nail polish remover and a cleanup brush
- A lamp, if you use gel
Step-by-step
- Prep. Shape, push back cuticles, and wipe nails clean. If you want a refresher, see my manicure at home guide.
- Base coat. Apply and cure or let it dry.
- Amber base. Paint one or two thin coats of the honey color. Aim for a glowing, slightly see-through shade.
- Add caramel blotches. With your detail brush, dab a few irregular patches of the lighter caramel. Keep them small and spaced out.
- Add the dark spots. Dab irregular shapes of dark brown. Use different sizes, and let a few touch.
- Soften the edges. Tap around the dark spots with a clean brush or sponge so they blend just a little into the base.
- Add tiny details. A few very small specks in the gaps give the pattern more realism.
- Cure and seal. Apply a glossy top coat and cure, or let polish dry completely.
- Clean up. Tidy the edges around the cuticle with remover on a small brush.
Tips for a realistic look
- Use thin layers. Thick spots look like stickers, not shell.
- Vary the shapes. Think of puddles, not perfect circles.
- Leave breathing room. Not every part of the nail needs a spot.
- Try a second thin layer of amber over the top of the dark spots for a deeper, more translucent effect. Cure it lightly if you use gel.
- Do not match every nail exactly. A little variation makes the set feel natural.
- Keep the lighting good. It is easier to judge the spots and edges.
Common mistakes and how to fix them
The spots look too uniform. Go back and add a few larger or smaller patches and overlap a couple.
It looks muddy. Too much dark brown. Dab a little amber over the edge to lighten it, then seal.
Edges look too sharp. Tap a clean brush or sponge around them while the color is still workable.
The base color looks flat. A sheer honey shade works better than an opaque tan. Try layering two thin coats.
The polish smudged. Let each layer fully dry or cure before adding the next, and use a light touch.
Variations to try
Once you are comfortable, try a pale, milky base for a softer tortoiseshell, or make the spots green or blue for a different shell look. You can also paint the pattern on just an accent nail, or only at the tips for a subtle take on the French tip.
For a seasonal mood, my roundup of easy fall nail art designs has more warm-toned ideas that pair nicely. If you want a glossy, stone-like effect too, marble nails for beginners uses a similar soft, irregular approach.
Making it last
A thick, glossy top coat keeps the design deep and shiny. Cap the free edge by running the brush along the tip, and reapply top coat every few days if you use regular polish. Wear gloves when you clean, and rub a little cuticle oil into your nails each day.
A quick safety note: work in a ventilated space, keep removers and gel products away from heat, and follow the lamp instructions for any gel you use. If a product irritates your skin, stop using it.
Choosing your shade combination
The classic mix is a warm honey base with espresso-brown spots, but you have room to play. A golden base with deep chocolate feels rich and autumnal. A paler, creamy base with soft taupe spots looks lighter and works in summer. If you wear a lot of black, a dark amber base with nearly black spots feels bold without being loud.
Before you commit to all ten nails, dab your colors onto a spare nail tip or a piece of paper. Seeing the honey next to the brown helps you decide whether the contrast is gentle enough. Sheer polishes can look very different in the bottle than on the nail, so a quick test saves you a repaint.
If you are short on time, paint the base on all nails and add the spots to only three or four. The plain ones still look polished, and the accent nails carry the design. You can always come back and fill in the rest another day.
Frequently asked questions
Can I do tortoiseshell nails with regular polish?
Yes. Work one nail at a time, and let each layer dry before adding more. Gel gives you more time to adjust the pattern.
What colors do I need for tortoiseshell nails?
A sheer amber or honey base and a dark brown are enough. A lighter caramel shade is a nice extra for depth.
Do the spots have to match on every nail?
No. The design looks best when it is a little irregular. Try to keep the same colors and general density, and let the shapes vary.