How to Crochet Baby Booties for Beginners (0-3 Months)
Learn how to crochet baby booties for newborns 0-3 months with this beginner-friendly guide: yarn, hook size, sizing, safety, and step-by-step construction.

The first time I finished a pair of crochet baby booties, I sat there turning them over in my hands like they were tiny treasures — which, honestly, they are. There’s something about making footwear small enough to fit in your palm that gets even non-crafty friends saying “you made that?” If you’ve been wanting to try, 0-3 month booties are one of the kindest places to start: the pieces are small, the yarn is forgiving, and you’ll have a finished pair in an evening or two.
Jump to section
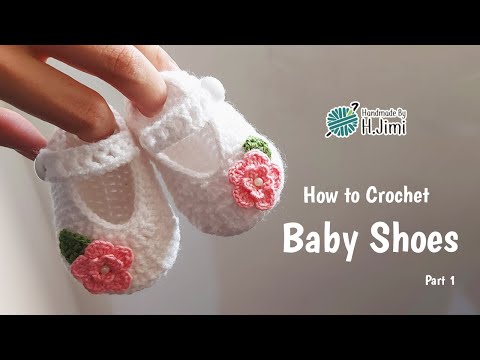
I want to walk you through the whole process in plain language before you pick up a hook — not a rigid row-by-row pattern, but the actual logic of how baby booties come together, plus the safety details that matter most when making something for a newborn. I also found a genuinely helpful visual walkthrough worth watching alongside these notes: Crochet Baby Booties Tutorial For Beginners! Part 1 by HjimiCrochet, which shows the stitches in motion far better than words can.
Why baby booties make such a lovely gift
Booties are one of the most practical handmade baby gifts I know. They’re small enough to finish quickly, use very little yarn, and feel special in a way store-bought pairs rarely do. A handmade gift for a new baby says “I thought about you specifically,” and that lands every time — for a baby shower, a hospital visit, or just because. Once you’ve made one pair, you’ll probably want to make five.
Choosing safe, soft yarn for newborn skin
Newborn skin is delicate, so yarn choice matters here more than almost anywhere else. A few things I keep in mind:
- Softness first. Look for yarn labeled “baby” or “soft” — it’s spun to avoid the scratchy feel that can irritate sensitive skin.
- Washability. Baby items get washed constantly, so machine-washable acrylic or an acrylic blend is usually the most practical choice.
- Fiber content. Pure wool can felt or shrink in the wash and occasionally causes sensitivity, so many crocheters prefer soft acrylic or an acrylic-cotton blend instead.
- Light or pastel colors aren’t required, but make it easier to see your stitches while you’re learning.
Whatever yarn you choose, hand-wash or check the care label before gifting, and let the caregiver know how to launder the booties safely.
Hook size and sizing for 0-3 months
For worsted-weight (#4) yarn, a 4.0mm to 5.0mm (US G/6 to H/8) hook is a typical starting point for newborn booties — check your yarn label’s suggested size, then go a touch smaller for a firmer, less gappy fabric. With a lighter DK or sport-weight yarn, you’ll usually size down to around 3.5mm to 4.0mm instead.
A newborn-to-3-month sole generally runs about 3.5 to 4 inches (9-10 cm) long. Every baby differs, so measure a similar-aged baby’s foot or a soft newborn shoe if you can. Your first bootie coming out slightly different from your second is completely normal — that’s just learning to read your own tension.
US crochet terms you’ll see
These instructions use US crochet terminology, the standard in most American patterns, including the video tutorial above. The stitches you’ll lean on most for booties:
- ch — chain stitch
- sc — single crochet
- hdc — half double crochet
- dc — double crochet
- inc / dec — increase / decrease
- sl st — slip stitch
The general construction, step by step
Every baby bootie pattern I’ve made follows roughly the same logical shape, even when stitch details differ. Knowing this flow will help you follow any pattern more confidently, including the one in the video.
1. Start with the sole (the oval base)
You begin with a chain, then work around it in a loop, increasing at both rounded ends to build an oval rather than a straight line. This oval becomes the sole your baby’s foot rests on, so a smooth, flat curve here — no puckering — helps the rest of the bootie sit properly.
2. Build up the sides
Once the sole is the right size, you work several rounds into the back loops (or a similarly consistent stitch) around the outer edge, without increasing anymore. This turns your flat oval into a little cup shape that will wrap around baby’s foot.
3. Shape the toe
Next, you work a section of decreases across the front portion to pull the fabric in and round off the toe, similar to shaping the toe of a sock. It’s usually the part that feels most like “real” garment-making.
4. Shape the cuff and ankle opening
After the toe is shaped, continue around the top opening with a few more rounds, sometimes switching stitch pattern (like a ribbed front-post/back-post texture) or color to create a cuff. A contrasting cuff color is a classic, easy way to make a plain bootie look intentional.
5. Add a strap or tie — safely
Many patterns add a simple crocheted strap or chain tie across the top of the foot to help it stay on. If you add one, keep it a crocheted chain or a soft ribbon sewn securely so it can’t be pulled loose — and skip tiny buttons, beads, snaps, or other small decorative attachments. Those are a real choking hazard for infants, so simplicity is the safest choice here, not just the easiest.
6. Seam and finish
Finally, weave in loose ends securely through several stitches so they can’t work free with washing, and give the finished pair a light steam or block if needed. Trim yarn tails close but not so close they can slip out, and double-check that nothing — tails, decorative bits, tags — feels loose enough to end up in a baby’s mouth.
A few honest beginner tips
Your first pair almost certainly won’t be perfectly symmetrical, and that’s genuinely fine — babies don’t check for matching tension. Count your stitches at the end of each round while learning; it’s the best habit for catching a mistake early instead of three rounds later. If a move in the video doesn’t quite make sense in words, pause it and try the motion with your own hook a few times — muscle memory does most of the teaching.
If you enjoy this project, browse more baby booties pattern ideas to try different cuffs and textures once you’ve got the basic shape down. Booties also pair naturally with a coordinating set — see how to crochet baby outfits if you’d like to build a full matching gift.
Frequently asked questions
What size hook and yarn should I use for newborn booties?
A 4.0mm to 5.0mm (US G/6 to H/8) hook with worsted-weight (#4) yarn is a common starting point for 0-3 month booties; check your yarn label’s suggested hook size and size down slightly for a firmer fabric.
Is acrylic or wool yarn better for baby booties?
Soft, machine-washable acrylic or an acrylic-cotton blend is generally the most practical and skin-friendly choice for baby items, since it’s easy to wash often and less likely to irritate sensitive skin than some wool.
How do I keep crochet baby booties from being a choking hazard?
Avoid small attachments like buttons, beads, or snaps, use a soft crocheted or sewn-on tie instead, and weave in all yarn tails securely so nothing can come loose with handling or washing.
I hope this gives you a clear, honest picture of how baby booties come together — and the confidence to grab a small ball of soft yarn and try your first pair this week. If you make some, I’d genuinely love to hear how they turned out. And when you’re ready for your next project, come explore more crochet projects here on the blog.