How to Crochet a Mini Ghost Amigurumi for Halloween
A tiny crochet ghost is a quick, cute Halloween project. Watch the video, then use my tips for tidy stitches and a perfect skirt.

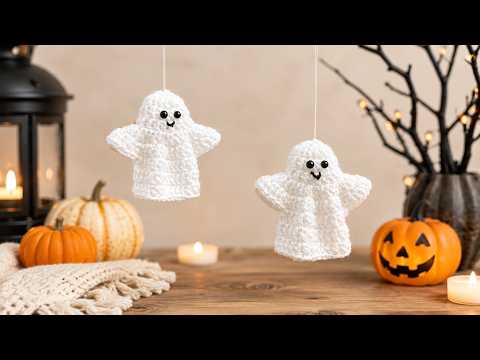
Every October I make a handful of tiny Halloween things: a pumpkin, a bat, and lately a ghost. The little ghost is the one people ask about, because it is round, cute, and somehow a bit smug. It is also one of the quickest amigurumi projects you can make.
Jump to section
A mini ghost amigurumi is basically a rounded dome that grows into a soft skirt, with two tiny eyes and maybe a blush cheek. It uses only a few basic stitches and a small amount of white yarn, so it is a perfect pick for beginners who are ready to move from flat work to a small stuffed toy.
The video below is from Butterfly Craft, who shows how to crochet a mini ghost in an easy Halloween tutorial. Watch it for the stitch-by-stitch process, then come back for my thoughts on yarn, stuffing, safety eyes, and ways to display your ghost.
Supplies for a mini ghost
You need very little, which is part of the charm. Here is what I gather before I begin.
- White or cream yarn. A smooth worsted cotton or acrylic shows stitches clearly. A small amount is enough for a mini ghost.
- A smaller hook than the yarn label suggests. Tight stitches stop the stuffing from peeking through. Try going down one or two sizes.
- Polyester fiberfill for stuffing.
- Black safety eyes or a little black yarn for embroidered eyes. Embroidery is the safer choice if the ghost might go near small children.
- A yarn needle, scissors, and a stitch marker.
- Optional: pink yarn or blush for cheeks, and a ribbon for hanging.
If you have never made a toy before, skim my guide to the magic ring first, since many amigurumi start with one. If the ring feels scary, you can start with a chain and slip stitch, though the ring gives a neater top.
How to crochet a mini ghost, step by step
Pattern details differ, so follow the video for exact counts. The general method, in my own words, goes like this.
- Start with a magic ring and work a first round of single crochet stitches into it. Pull the ring closed.
- Increase evenly round by round so the circle grows into a rounded dome. Mark the start of each round so you can keep count.
- Stop increasing and work several rounds straight down to form the body of the ghost.
- Place safety eyes between the rounds if you are using them, before you finish closing the piece.
- Begin stuffing the ghost lightly, pushing the filling into the top first so the head is full.
- For the scalloped bottom edge, work a repeating pattern of small stitches, slip stitches, or shells around the final round. This gives the wavy ghost skirt.
- Fasten off, close any gap, and weave in the tail. Add cheeks or details.
Stuff as you go, before the opening gets too small. It is much easier to add a little filling at a time than to fight a tiny hole at the end.
Tips for a cute, neat ghost
- Use a stitch marker every round. Amigurumi spirals, and without a marker it is easy to lose your place.
- Crochet tightly enough to hide the stuffing. If you can see white fluff through the stitches, go down a hook size.
- Place the eyes low and wide for a cuter look. Try pinning them before committing.
- Weigh the bottom. A ghost that stands upright looks great on a shelf. A little flat base helps it sit.
- Keep stuffing soft but full. Overstuffing stretches the stitches and shows gaps.
Common mistakes and how to fix them
Stuffing shows through the stitches. Switch to a smaller hook and crochet a bit tighter. You can also stuff less, or line the inside with a little extra yarn.
The ghost is lumpy. Lumps often come from uneven stuffing. Pull the filling apart into small pieces before you add it, and press gently into the shape.
The edge will not ruffle evenly. Recount the last round and make sure each repeat has the same stitches. Mark every repeat with a stitch marker if needed.
The eyes look crooked. Check their position against each other before you snap the backs on. Unfinished eyes can usually be moved.
A hole shows at the top. Pull the magic ring tighter, or weave the tail through and cinch from the inside.
Halloween ideas for your ghost
- Make a small group in different sizes for a mantel display.
- Attach a loop of yarn or ribbon to hang one on a door handle or tree branch.
- Use gray or glow-in-the-dark yarn for a spooky variation.
- Add a tiny bow or a top hat for a fancier ghost.
- Pair it with the crochet pumpkin for a simple autumn set.
- Try the easy fall nail art designs for a matching Halloween manicure.
Finishing and care
Weave in every tail securely and trim the ends. If you used safety eyes, tug them gently to make sure they are firmly locked. For a child, skip hard eyes and embroider them instead, and never give a toy with small parts to a very young child.
Clean your ghost by spot washing with a damp cloth and mild soap. Stuffed toys do not like the washing machine, because the stuffing can clump. Let it air dry fully. Store it somewhere dry so the white yarn stays bright until next October.
Frequently asked questions
Is a mini ghost amigurumi good for beginners?
Yes. It uses basic stitches and only a few rounds of shaping. If you can make a magic ring and a single crochet, you can finish one in an evening.
What yarn is best for a white ghost?
A smooth white or cream worsted cotton or acrylic works well. Choose a yarn that does not split, so the stitches look clean and the stuffing stays hidden.
Are safety eyes okay for a crochet ghost?
They are fine for decorations and for older kids, when locked on firmly. For babies and toddlers, embroider the eyes instead of using parts that could come off.